Can You Juggle? πŸ€Ήβ€β™€οΈ

Juggling.jpg

EXPERIENCE > KNOWLEDGE

Can You Juggle? πŸ€Ήβ€β™€οΈ
Go to Amazon, buy the best-selling book on juggling.
πŸ“– Read it.
Can you juggle?

Hell No!

You learn to juggle by juggling.
Practicing, failing, picking it up again, learning from mistakes, and improving naturally.

It's the same principle for your art.
YOU CREATE BETTER IMAGES BY CREATING IMAGES. 
You can't be an artist that doesn't create art! Go Make Some Art.

Want to uplevel your CGI skills?
Take the Course

Tactics Vs Strategy

Jake-Presenting.jpg

Have you ever enrolled in a course and never started it? Remember that feeling of joy when the payment went through and knowing your life is going to change? Or you watched the first two lessons, but never picked it up again. That's because the strategy was missing.

Courses bridge the gap between where you are and where you want to be. They solve a problem. You can find the solution through trial and error, or learn from someone who’s done it before.

Whichever way you choose you need two things. 

  1. A Tactic (the course)

  2. A Strategy (the schedule to complete the course)

You can’t bridge the gap with only a tactic, you need a strategy too! That's the difference between students that fail and students that succeed.

Enrol In Course (Tactic)

+ Schedule Time (Strategy)

= Life You Want (Solution)

Untitled design (11).png

So, What’s The Strategy?

I’m glad you asked. A method called Don't Break the Chain (or The Seinfeld Method) The idea is to put a calendar on the wall in a prominent place. For each day you complete a section of the course, put a big X on the calendar. After a few days, you’ll have a chain. Each day the chain will get longer. This is pretty motivating, then all you have to do is not break the chain. It sounds easy because it is. And it works.

Keep in mind what is going to improve for you when you take action every day. Below is a link to the skills and tactics that helped me in creating the work I wanted to do. Combine these with the right strategy and you’ll be earning good money from CGI work in no time.

Courses For 3D Artists

CGI News: Fake Interiors, Desks, and Evermotion Subscriptions 🏒

"Simplifying the techniques used in the CGI industry."

Here are 3 things I thought were worth sharing this week:


πŸ”¨ Tools

wParallax

A really interesting method to create realistic interiors using just one plane. The method is often used in video games and now we can take advantage of it for architectural visualisation.

https://wparallax.com/

πŸ“Ί WATCH

CGI Equipment

If you missed it here is the current equipment I use and the home set-up. I have since moved to co-working. Shall I make a travel/remote working set-up video? Comment on the video if you think so.

https://youtu.be/ZInOLtMi8qE

πŸ”§ Tools

Evermotion Subscription

Evermotion has announced a subscription service to access their model collection. This could be a good idea if you find yourself needing a lot of high-quality assets. There are currently 5 options to choose from.

https://evermotion.org/shop/evermotion_pass

Thanks for reading! If you like this newsletter and want to support it, join a course or refer a friend.


Render On!

CGI News: My Favourite Website, 3ds Max Update + New Exterior Tutorial 🌳

"Simplifying the techniques used in the CGI industry."

Here are 3 things I thought were worth sharing this week:


πŸ“– Tools

Film.ai

I absolutely love this site. Whether you are looking for inspiration or color schemes, this is going to be massively useful for influencing your images.

https://beta.flim.ai/

πŸ“Ί WATCH

Fast Exteriors

Take a watch of a new lecture for the exterior visualisation course on YouTube. We utilise Chaos Cosmos and Material Library to quickly put together a Car Advert proposal.

https://youtu.be/277Jb3rJBj4

πŸ“– Tools

3ds Max 2022.1

3ds Max 2022 has received its first update. The 2022.1 update boasts Faster Smart Extrude, Deformation Modifier, Enhanced Smooth Modifier. More details can be found below.

https://makeanything.autodesk.com/3dsmax

Thanks for reading! If you like this newsletter and want to support it, join a course or refer a friend.


Render On!

CGI News: City Building, Image of the Week, and Photorealistic Rendering πŸ™

"Simplifying the techniques used in the CGI industry."

Here are 3 things I thought were worth sharing this week:


πŸ“– READ

Photorealistic Visualisation: 5 Tips

In this article, you will learn the 5 key steps to create photorealistic renderings, whether you have been using 3ds Max for years or are just starting out you should find this article useful.

https://www.luxuryvisuals.com/jaked3d/photorealistic-rendering-tips

❎ AWARDS

Image of the Week: Arif Aziz

Image of the week is from Arif Aziz who created these interior renders and received his Certificate of Attendance. Congrats Arif.


Want to make images like Arif? Click here

Arif IOW.jpg

πŸ“Ί WATCH

iToo's video demonstrates a really smart way to build cities and background buildings using their tool TheParametricLibrary

https://www.youtube.com/watch?v=R2aLaakRKj4&t=79s

Thanks for reading! If you like this newsletter and want to support it, join a course or refer a friend.


Render On!

Photorealistic Visualisation: 5 Tips To Create Your First Photorealistic Image in 3ds Max + Vray

Introduction

In this article, you will learn the 5 key steps to create photorealistic renderings, whether you have been using 3ds Max for years or are just starting out you should find this article useful.

We will cover the 3ds Max user interface, and then we will create a virtual 3D photography studio. From there we will look at setting up the lights and camera to get the most realistic renders we can. Don't worry about alpha channels, secondary engines, or image samplers. The key to realism is simplicity.


What Software to use?

First up, for those of you that are new here… (If you aren't feel free to skip this bit). We will use Autodesk 3ds Max and V-Ray from Chaos Group as our render engine.


What is 3Ds Max software? 3Ds Max is a 3D modeling software for architects, designers, and video game artists. 


What is V-Ray? V-Ray is used to render in 3ds Max. V-Ray has a complete set of lighting, shading, and rendering tools that can be used with 3ds Max.


The following tips are taken from a free kickstarter course that can be found here. Feel free to just jump straight over there if you want a step-by-step guide. 

 Now, let's get started,


1. Learn the User Interface (UI). These are the keys to the kingdom, this is how we navigate through 3D space. The first lesson introduces the user interface of 3ds Max.


2. Get your 3d model into 3ds Max. There are plenty of places to get a 3D model if you don't have your own. In this video, I show you how to bring in a 3D model you have made, been sent or downloaded.


3. Create your virtual studio. We are virtual photographers so we need to do as real photography. This is how we achieve 'photo' realism.


4. Setting up your camera and lights. Realistic lighting is the key to photorealistic renderings. As we are creating a studio scene we will be using artificial lighting (interior lights) as opposed to a HDRI or sun.


5. Interactive render. Finally, we use the interactive render to see our 3D rendering. Interactive render saves render time and allows us to see our results before the final render. Once we are happy we can render locally or use one of the cloud services such as Chaos Cloud. As you will see when it comes to rendering our final image there is no need to change the 3ds Max or Vray 5 render settings.


If you want to explore how we can add post-production to our image then have a watch of the whole mini course.

Conclusion

Photorealistic rendering has become very popular, and it’s easy to see why. Entertainment is moving to digital. Just think back to the last music video you saw, I bet it had an element of CGI in it. Products are already there, if you viewed a product in an online store it was likely 3D. Advertising has been doing it for years. And now, photography is moving to full CGI for a ton of reasons.

Will you be prepared? Do you want step-by-step instructions to implement all these tips?

Watch all the lessons here, free!

CGI News: White Balance, 100+ Models and Cloud Updates β›…

"Simplifying the techniques used in the CGI industry."

Here are 3 things I thought were worth sharing this week:


πŸ”¨ TOOLS

100+ new models added to Chaos Cosmos

Chaos Cosmos has received its first update. The update adds over 100 new 3D models.

https://cosmos.chaos.com/


πŸ“Ί WATCH

How to use White Balance in 3ds Max

Quite a few new videos have been added to the YouTube channel. Including a white balance video showing how to change the overall temperature of your image in 3ds Max and V-Ray.

https://youtu.be/VzANLfTyf_Q


πŸ”¨ TOOLS

Chaos Cloud update

Chaos Cosmos wasn't the only one to get an update. Chaos Cloud has too. The update enables us to put credit limits per image, job analytics, batch rendering, and GPU rendering.

Get 20 Free Cloud Credits Here

Thanks for reading! If you like this newsletter and want to support it, join a course or refer a friend.


Render On!

CGI News: Project Starline, V-Ray Frame Buffer and Luxury Visuals ⭐

"Simplifying the techniques used in the CGI industry."

Here are 3 things I thought were worth sharing this week:

πŸ“Ί WATCH

Google's Project Starline

Check out Google's Project Starline. It looks like some clever use of Normal Maps makes you feel like you are there on video calls.


πŸ”¨ TOOLS

V-Ray Frame Buffer Vs Output image

Some people were having trouble with the V-Ray frame buffer and the output image not matching. If you are struggling to make your output files look the same when saving your image out of 3ds Max and V-Ray then this could be the solution.

πŸ“° ET CETERA

LuxuryVisuals.com

The Luxury Visuals website has had an update. Feel free to take a look around and let me know what you think. Be sure to check out the Tech and Blog sections.

Thanks for reading! If you like this newsletter and want to support it, join a course or refer a friend.

Render On!

The Secret Render Button πŸ”˜

Have you ever looked at another CGI Artist's render and thought...

"What's the secret? There is something that they know about 3D rendering that I don't."

Secret Buttons copy.jpg


Want to know the secret to create photorealistic images? πŸ§β€β™‚οΈ

It is easier to believe that there is a magic 'photorealistic image' button. Hidden deep in the render settings that only the elite CGI artists know how to access.

It doesn't exist.

Believe me, I spent a long time searching for that secret photorealistic render tick box.

In a world of 5-minute abs and master CGI in 90 minutes courses 😁, it does feel easier to believe that there is a secret button.


The truth about architectural visualisations. πŸ‘‚

The truth is, it takes good old-fashioned experience. Not the type of experience you see on a 3D rendering job listing. I am talking about habit.

I can teach you everything I know. Everything I learned from my experience in architectural visualisations.

But you have to have your own experience. This goes for any of the creative industries.

If you use my experience you will learn the tools faster than I did. But you have to use the tools frequently.

You can't be a 3D Artist that doesn't create 3D art!


Experience. πŸ“ˆ

In the lectures, there are Q&A sections. I have the experience to answer your question because, once upon a time, I stayed up all night trying to fix that problem. That's experience.

This is how you learn and grow, not by ticking off a course as done βœ…, but by using it.

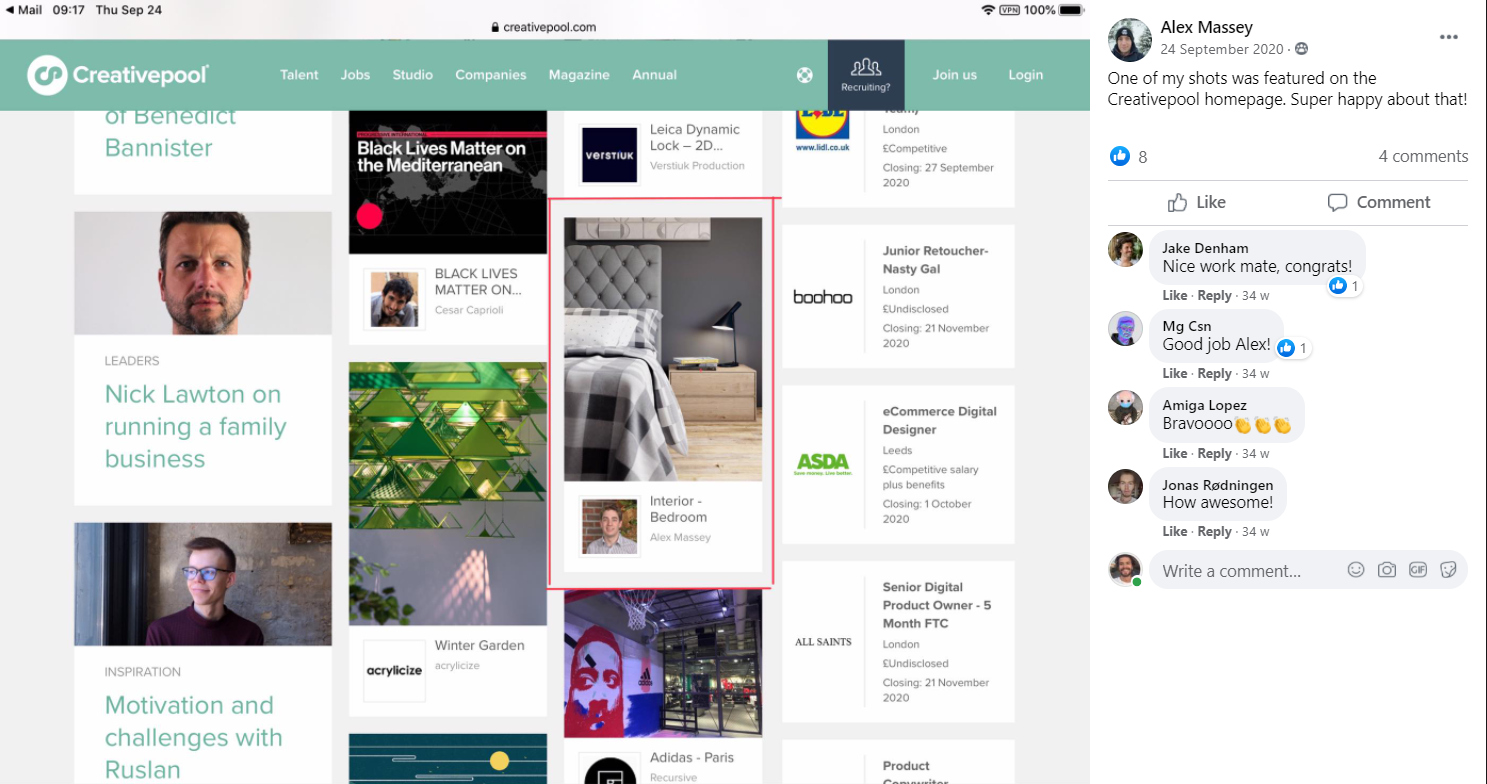
This is what Alex did.

Meet Alex.

Alex took the V-Ray Certification Course and has been an active member of the student community group. It has been inspiring to watch him develop his skillset and post his architectural renders frequently.

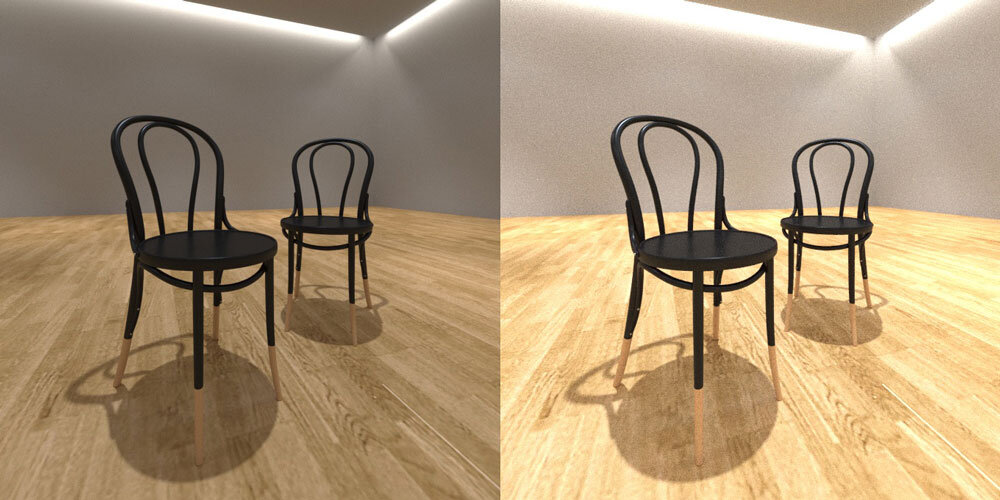
The lectures give you the head start, but you need to hone your mind into thinking like a 3D artist in a CGI Studio. You do that by working on your 3D modeling, tinkering with light sources, and working on your own CGI projects.

This work ethic landed Alex on the Creativepool home page and allowed him to create a solid portfolio of CGI projects.

2021-05-25 09_34_09-Facebook.png


You can only access the magic photorealistic rendering button by working on your craft every day.

So what do you say? Ready to get some experience?

Check out the V-Ray Certification Course.

CGI News: MetaHuman, Relighting Humans and Autodesk USD πŸ’‘

"Simplifying the techniques used in the CGI industry."

Here are 3 things I thought were worth sharing this week:

πŸ”¨ TOOLS

MetaHuman Creator

MetaHuman Creator is a cloud-based app that allows anyone to create photorealistic digital humans, fully rigged and complete with hair and clothing. MetaHuman comes from Unreal Engine and has a free Early Acces program. This one is really worth checking out.

Find out more here - https://pxlme.me/MetaHuman

πŸ“Ί WATCH

Relight Portraits for Background Replacement

Here is a fascinating video on how technology can change the background of a portrait and relight the subject to create much more realistic results. The process uses only a single RGB image and a HDR image to light the environment.


πŸ”¨ TOOLS

Autodesk releases USD for 3ds Max

Autodesk has released USD for 3ds Max. The plugin enables users to import and export meshes and materials between Autodesk products. For example Maya and 3ds Max. This will enable non-destructive editing between artists and studios.

You can find out more here - https://pxlme.me/3dsMax-USD


Thanks for reading! If you like this newsletter and want to support it, join a course or refer a friend.

Render On!

Footer.jpg

CGI News: New content, adding people, and image of the week 🀩

"Simplifying the techniques used in the CGI industry."

Here are 3 things I thought were worth sharing this week:

❎ COMMUNITY

Image of the week

Blal As'ad posted a top-quality set of images as part of the interior rendering course. He said "I learned a lot of very useful things, thank you very much for this amazing course."

If you would like to create images like Blal, check out the interior rendering course.

Credit: Blal As'ad, student of the Interior Rendering Course

Credit: Blal As'ad, student of the Interior Rendering Course


πŸ“Ί WATCH

Updates to the Interior Rendering Course.

The Interior Rendering Course is continually updated. A whole new section has been added called Adding People to our Images. In this section, we look at how we can add life to our image using both 2D and 3D people.


πŸ“° ET CETERA

Photoshop for CGI Artists - The Quickest Way

The Photoshop for CGI Artist course launched last month and currently has a 5-star rating. It is designed for anyone wanting to do professional post-production on their renders. If that sounds like you here is a discount code.


Thanks for reading! If you like this newsletter and want to support it, join a course or refer a friend.


Render On!

CGI News: Why render 32 bit, the most important skill of all and image of the week

"Simplifying the techniques used in the CGI industry."

Here are 3 things I thought were worth sharing this week:

❎ COMMUNITY

Image of the week

Check out the 'Luxury Visual' Andrej Banasik of Incisive Studio posted in the Facebook Group. Andrej said "I love it personally. For now it's probably one of my best uncommercial renders."

Andrej-web.jpg

πŸ“Ί WATCH

Understand 32-bit Renders in 3:20 Minutes | Why use 32-bit images?

Most CG artists are familiar with 32-bit images. It gives you a wide dynamic range, maximum color bit depth, and is used by most of the big players in visual effects to create Hollywood movie magic.

So why do you need to render 32-bit images? In this video, I answer that question:

πŸ“– READ

What is the most important skill of all? πŸ’­

We all know that learning a new skill is beneficial and helps us to stay relevant. We will get better at our job or even get a new job. As the rate of change increases, it is clear that we need to adapt our skills and sometimes learn new ones.

So why the friction? πŸš΅β€β™‚οΈ

Read the article:

Thanks for reading! If you like this newsletter and want to support it, join a course or refer a friend.

Render On!

CGI News: 3ds Max update, CGI artist laptop and a free Photoshop tutorial

Header.jpg

"Simplifying the techniques used in the CGI industry."

Here are 3 things I thought were worth sharing this week:

πŸ”¨ TOOLS

3ds Max 2022 Released

Autodesk has released the latest instalment of 3ds Max. This version comes with updates to many modifiers including Slice, Symmetry, Extrude and Relax. As well as updates to Smart Extrude that introduce "Cut Through" and Edit Poly support.

πŸ“Ί WATCH

Photoshop For CGI Tutorial

Learn the basics of Photoshop in 30 minutes. This tutorial is to familiarize existing or aspiring CGI artists with Adobe Photoshop. Going over the basic tools and aspects to know when starting with Photoshop as a CGI artist.

πŸ“– READ

The CGI Artist Desk Setup

Here is what laptop I use and everything else on my desk. Since not being able to travel I have been building a semi-permanent desk set-up. I want it to be as self-contained as possible without spending a ton of money. So here is how I got on.

Thanks for reading! If you like this newsletter and want to support it, join a course or refer a friend.

Render On!

Footer.jpg

Image saved from V-Ray Frame Buffer not the same

Issue Solved: Saving Renders. V-Ray Frame Buffer rendering looks different when opened in Photoshop or image viewer.

When saving a render out of V-Ray 5 in 3ds Max, the .jpg (or other image formats) looks different to the render in 3ds Max. We look at a students scene to see why this is happening. And how we can make the saved file and the frame buffer file look the same.

compare.jpg

If you are struggling to make your renderings look the same when saving out of 3ds Max and V-Ray this should help.

πŸ€” Why is this happening?

Opening the scene and hitting the interactive rendering button I can see the exposure correction is being made in the Display Correction. If I save this image out as a .jpg and open it next to our frame buffer, we are going to see it looks very different. The rendering looks overexposed compared to the image in the frame buffer.

This is because the rendering is saving out with no exposure correction. The reason for this is because the exposure correction of 1.4, in this case, is being made in the Display Correction. And if you look next to Exposure you can see in brackets Display Only. So this is not changing the exposure on our render just on the display.

gamma.png

πŸ”§ What's the fix?

To change the exposure settings we want to add an exposure layer. Click the + and add an exposure adjustment layer. We can change the exposure here. Then save the current channel as a jpeg and if we compare them we can see they are the same.

2021-04-13 09_03_41-VFB difference - VLC media player.png

πŸ”‘ Conclusion

If you are struggling to get the render output and the image in the V-Ray frame buffer to match make sure you are adding adjustment layers to your image rather than making updates in the display correction

Gamma: This solved the issue for the students. If this did not solve the issue for you, look into the gamma settings. Some people have struggled with gamma corrections resulting in a VFB and rendering mismatch.

Image Channels: It is also worth checking your image channels in the V-Ray VFB. Over where the separate render channels are, such as the alpha channel and RGB color channel are. Save the effectsResult channel out and see if that has the color corrections applied.


Get V-Ray here - https://pxlme.me/wA3IkNh5
20 free Chaos Cloud Credits - https://pxlme.me/a-XJfGea
V-Ray Classes here - www.luxuryvisuals.com/academy

Adobe Dimension Grey Screen Fix + After Effects Crash Fix

😊 I was excited to start using Adobe Dimension. (Adobe Dimension is software for graphic designers to create 3D images.)

😟 But I was sad to find it showed nothing but a blank grey screen when I opened it. 

Dimension.jpg

This post was originally to demonstrate a workaround to get Adobe Dimension to load after getting nothing except a grey screen instead of the viewport. But things got deeper when both After Effects and Adobe Dimension started crashing on their opening splash screens and Autodesk 3ds Max just would not open.

I assumed these errors were being caused by hardware issues, (probably graphics card)

πŸ’» How to fix the blank grey screen

1️⃣ Issue one. Adobe Dimensions grey screen when loading.

This was solved by simply unplugging my external monitor from my laptop, which is an XPS 15in, running Windows. I should also note my extra screens are plugged into a Dell D6000 Dock. (Desk Setup)

So to solve this I could unplug my second screen, open Dimension, let it load and then plug in the screen and start using it normally.

Not the ideal solution. But a solution none the less...


But then things really started hitting the fan. It turned out that this error was effecting multiple software. After Effects would get stuck on the splash screen, Dimension started to crash when opened and 3ds Max didn't even bother to do anything.

2021-03-23 11_16_21-Adobe Fix V2 - VLC media player.png
2021-03-23 11_16_31-Adobe Fix V2 - VLC media player.png
2021-03-19 17_40_45-Camtasia 9.png

I tried the old faithful unplug replug trick and it worked but it was not fun.

Everyone will tell you to update your drivers and software. But I always feel a little dubious about that being a fix. But none the less I spent ages installing the latest drivers, software and updates, to no avail.

I then disabled the Intel Driver and that worked, but again not ideal.


πŸ”§But this was the fix

In Windows > Settings > Display > Multiple > Make the laptop the Main Display.

2021-03-23 11_16_59-Adobe Fix V2 - VLC media player.png

ο»ΏNow when I load Dimension, After Effect or 3ds Max they all work fine. They do all load up on the 'main screen' (the laptop) and need me to drag them onto my external monitor. But a small price to pay to have everything working. I hope this has helped and saved you some time.

If you do know a better fix I would love to hear it. 

If you want to try out Dimension or any of the other Adobe products here is a link to download the Creative Cloud.

What is the most important skill of all? πŸ’­

pexels-energepiccom-313690.jpg

We all know that learning a new skill is beneficial and helps us to stay relevant. We will get better at our job or even get a new job.

As the rate of change increases, it is clear that we need to adapt our skills and sometimes learn new ones.

So why the friction? πŸš΅β€β™‚οΈ

The reason we have friction is that we have to return to being an amateur. We have worked hard to become a skilled professional so reverting back to amateur can be difficult. And, the further along you go in your career the harder it is to change.

How do you get better at learning new skills? πŸ“

... you learn new skills regularly.

We practise sport or CGI to get better at it. We also need to practice learning new skills to become better and ease that friction.

Learning is a skill that is as important to cultivate as the skill we are learning.

The more you spend your time learning new skills the easier it becomes to learn new skills. So in that sense, no learning is ever wasted.

No one likes to go from a professional to an amateur. But to improve or learn a new skill you need to be willing to return to being a beginner.

Whether that's learning 3D modelling. Transitioning from traditional photography to CGI. It will seem hard at first, but it will be good for you. Set an hour aside in your calendar and take the first step.

Ready to Skill Up?

Here is a list of all the skills you have the opportunity to learn.

The CGI Artist Desk Setup

Since not being able to travel I have been building a semi-permanent desk set-up. This post focuses on 3D artists, but I am sure video editors, animators and people from any area of design will find it helpful.

The goal is to have a desk that I can take anywhere in the UK and pitch up, almost like a camp if you were on an expedition. β›Ί I want it to be as self-contained as possible without spending a ton of money. So here is how I got on.

Since not being able to travel I have been building a semi-permanent desk set-up. This video focuses on 3D artists, but I am sure video editors, animators an...

πŸ’» DELL XPS 15

ο»ΏThe centre of my set up is the Dell XPS 15inch laptop, with an i9 Processor, 2tb solid state hard drive and 32Gb of ram. I chose this as this was as much power I could get into a laptop, whilst keeping it lightweight and having decent battery times. 3D, video and design software can chew a battery up.

The reason I have opted for a laptop is I value the freedom of moving around and working where I please. I can hear other 3D Artists, video editors and animators banging their heads against their desks. But, the power of the Dell XPS is good enough to do most of my work. The XPS can run any software I throw at it and has no problem if I want to model on the road.

For a long time, I have done most of my rendering, both stills and animation in 'the cloud'. First with Rebus Farm and now with Chaos Cloud. You can get 20 free credits here. This leaves the laptop free for the design work rather than the rendering.

One of the first things I brought was a laptop hinge and holder. Whilst travelling I use the Nexstand K2 laptop stand. But, I wanted to have as much desk space as possible when it came to my more permanent desk set-up.

Get the Dell here.


πŸ’‘ LIGHT BAR

In the same vein as keeping the desk uncluttered, the ScreenBar Plus sits off my desk and replaces the need for a traditional lamp on my desk. Another benefit is that there is no glare on the screen from the light bar. It is not something for the road, but a benefit to finally having a dedicated desk.

Lighting is something that is overlooked when spending long hours in front of a screen. This bit of kit is actually designed to reduce eye strain. This is something I didn't realise I needed until I tried it.

Not only for eye health but also for color correcting your images as an animator, video editor or cgi artist. You can change the brightness and color temperature from the dial that sits on the desk.

There is also a sensor that will react to the light in the room, creating the optimal light set up. So I just leave it on auto most of the time. Until I tried it I didn't realise how badly lit my desk was. I spend tons of time journaling and the light bar gives the perfect light for these kinds of offline tasks.

Get the Light Bar here.


πŸ“– JOURNAL

The number one journal I recommend is the Leuchtturm1917, Whitelines Link, Ruled, A5. White lines seem so simple but it blows my mind that all notebooks are not white lined. If I draw something and photograph it, it is as clear as a plain piece of paper. When I write I have the ruled guides.

It also has some cool QR codes that link to email, Dropbox and Evernote, but I have never used it.

Get the Leuchtturm 1917 White Lines here.

πŸ“Ί MONITOR

I was given the Samsung 32inch monitor. When travelling I use the Asus MB16B+ as an extra screen. The MB168B+ isn't available anymore but I think the Zen screen will do the job now. Screen space is massive, even when I am packing light I take a second screen.

β›΅ DOCK

All of this plugs into the Dell D6000 Dock. The idea here is that I have one cable that I need to plug into the laptop and it transforms into a desktop. You can connect up to 3 monitors and charge the laptop via the USB-C and it gives you four well-needed USB ports. The dock does have some issues with Adobe software, where I need to unplug the dock when starting software such as Dimension or After Effects.

Get the Dell D6000 here.


🐭 MOUSE & KEYBOARD

The mouse and keyboard are Logitech. The mouse is one great piece of kit. I have had this for nearly 10 years (It may be due an upgrade soon). If I was to upgrade, it would be to the newer version, the MX Master 3.

Keyboard, a silent one maybe the next move. People have said they don't like hearing me banging the buttons in some of my tutorials. I am eyeing up the Logitech craft.

Get the Logitech MX and Craft here.

🎀 MICROPHONE

The microphone was sent to me by Skillshare a few years ago and it is fantastic. It's the AT2020USB+, it has been around the world a few times and is still doing the biz.

A recent purchase for this desk set up was the hinge which means I can pull it in and out of the way easily. This has been massive in an attempt to remove any friction in creating videos.

Get the AT2020+ here.

πŸ§β€β™‚οΈ DESK

After reading Deskbound, and working from standing desks, I knew I wanted this desk to go from standing to sitting. If you are early on in your career take care of your body. Being sat at a desk for years takes its toll and takes a lot of deliberate effort to undo.

For the desk itself, the legs are from Flexispot and have a simple up and down. The desktop itself is made from 3 wooden scaffold planks donated by my brother in law.

Get the Flexispot desk here.

πŸͺ‘ CHAIR

I chose the Fullwatt Gaming Chair and I honestly can not be happier. I am a particular fan of the footrest. I am not as keen on the big graphics but I just reversed the pillows.

Get the Fullwatt Gaming Chair here.

Other bits and pieces are the oversized desk mat. Cable clips on the back of the desk for easy access to any wires. And, floor mats for when standing. This can all be found on the Amazon list here.

That is where I am at with the semi-permanent desk set up. If you want to know more about software, have a look here.

I noted a few bits that I use when travelling. If you'd like me to go deeper into the travelling experiences, equipment and software then let me know.

Let me know in the comments your number one desk essential.

πŸ’» TOOLS AND TECH:

Full list of products mentioned

BenQ Website

Light Bar Plus

Software

Render On!

Render-On-Jake.jpg

Do You Know Your Resolutions? 72 vs 300 DPI πŸ“ (March News)

Here's my update for Mar 15, 2021...

πŸ₯‡ A massive congratulations to February's CGI Artists that received their Official V-Ray Certificates Of Attendance

Click here to join March's cohort


πŸŽ₯ Best Resolution for Renders, 72 or 300? Images for Print & Web | Pixels, PPI & Resolution Explained

In this video, I show you how to set up your image resolution for print or web. Explain what PPI is and why it matters to you.

Click here to watch the video

πŸŽ₯ The Quickest Way to Center Pivot on a 3ds Max Object

F Lash asked "is this seriously the quickest way to recenter the pivot point?" on a video from a few years ago. It wasn't so in this video, I show you how to reset and centre the pivot on an object using a keyboard shortcut in 3ds Max.

Click here to watch the video

πŸŽ₯ The Quickest Way to Center and Ground a Pivot in 3ds Max

And then, Vuk asked how to center and ground a pivot on the object, fast. So here is a script and video centering and grounding a pivot. This is useful for snapping objects to the floor for example.

Download the Script (Under Scripts)

Click here to watch the video

πŸ—’οΈ V-Ray 5.1 Update Video | CHAOS COSMO + all the updates you need to know about.

Chaos Group has released V-Ray 5 update 1. Alongside a rebrand, V-Ray has a ton of amazing new features. Chaos Cosmos is one of the biggest features. It is a content library that can be used across all V-Ray packages. So they will work in V-Ray for 3ds Max as well as Sketch-Up for example.

Click here to read more

Render On!

Render-On-Jake.jpg

V-Ray 5.1 Update Video | CHAOS COSMO + all the updates you need to know about.

Chaos Group has released V-Ray 5 update 1. Alongside a rebrand, V-Ray has a ton of amazing new features. Chaos Cosmos is one of the biggest features. Chaos Cosmos is a content library that can be used across all V-Ray packages. So they will work in V-Ray for 3ds Max as well as Sketch-Up for example.

Other features include the ability to add multiple hdri's to one render, a new camera lister and batch cameras in Chaos Cloud.

Check out the video below to see V-Ray 5.1 and Chaos Cosmos in action.
Get V-Ray here - https://pxlme.me/wA3IkNh5
20 free Chaos Cloud Credits - https://pxlme.me/a-XJfGea
V-Ray Classes here - www.luxuryvisuals.com/academy

What are you working on that your future self will thank you for?

pexels-andrea-piacquadio-935756-.jpg

3D modelling is the creation of digital assets.
Do you think the need for digital assets is on the rise or declining?

I am going to suggest that the need for digital assets is increasing. Photoshoots, music videos and advertising are now all turning to CGI. Think about the last music video you watched or the last ad you saw. I'm sure that if it's recent then it had an element of CGI.

This is because it is becoming harder and harder to get on set, source products and get crew together in real life. This coupled with the rise in online shopping, demand for more e-commerce product images has increased.

This makes me think about how lucky we are to be involved in the world of 3D. With all the changes that are happening in the world, I feel fortunate to have a skill set that appears to be in demand.

More people are spending time in virtual environments and virtual reality. Again, this trend is only going to continue. So a solid skill to work on is your 3D modelling skills. (Learn free here - https://skl.sh/39R2Vo9)

Being in lockdown currently can be difficult at times. But something that keeps me motivated is asking myself how can I best use this time?

What are you currently working on that your future self will thank you for?

Render On!

Render-On-Jake.jpg